PhishGrid PhishGrid PhishGrid PhishGrid
  • Home
  • Platform
  • Service
  • Resources
  • Contact
  • Login
Signup for Free
Signup for Free

Guides

1
  • Phishing Attack Dashboard

Targets

7
  • What are Targets?
  • Adding a Single Target to Attack
  • Import Users using XLSX File
  • Synchronizing Targets using XLSX
  • Target Groups
  • Adding a new Group
  • Managing groups in PhishGrid

Templates

4
  • What is Template ?
  • Adding a Phishing Template
  • Adding a Vishing Template
  • Viewing & Managing Templates

Contents

4
  • What is Content?
  • Adding New Content
  • Viewing and Managing Contents
  • Setting up redirection to your own awareness content

Campaigns

3
  • What is a Phishing Campaign?
  • Create your first campaign
  • Phishing Attack Campaign Analytics

Reports

1
  • Filtering and Downloading Campaign Reports

FAQs

1
  • Email not being received – Troubleshooting Guide

Admin

5
  • Whitelisting
    • IP & Domains
    • IceWarp Whitelisting
    • Whitelist in Gsuite
    • Microsoft/Office 365 Whitelisting
  • FAQ & Troubleshooting
    • Handling and Preventing False Positives
View Categories

Setting up redirection to your own awareness content

< 1 min read

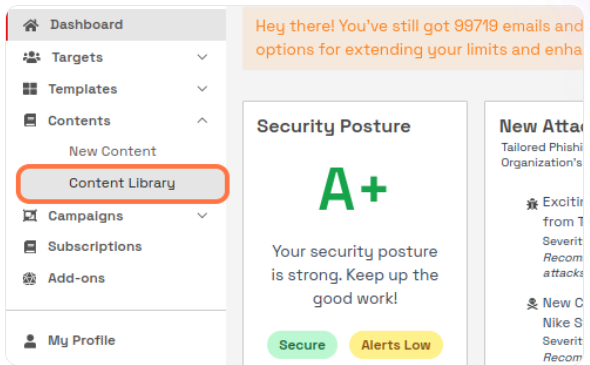
Step 1: Navigate to content creation
Setting up redirection to your own awareness content

Navigate to the PhishGrid Dashboard.
Click on the ‘content’ drop-down and then click on “New Content” to begin creating your training content/Awareness content.

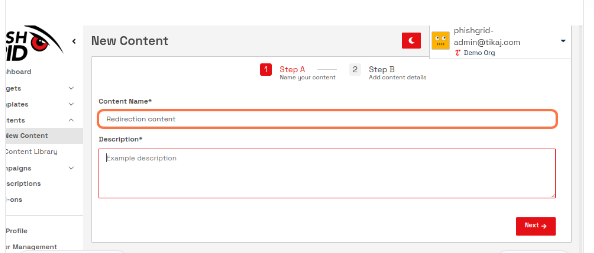
Step 2: Enter Basic Information
Setting up redirection to your own awareness content

Enter the “Content name” and “Content description” to help identify and describe the purpose of your template.

Step 3: Configure Content Settings

  • Type in any relevant “Tag” for better categorization.
  • Choose the difficulty level by clicking on options like ‘Beginner’,‘Intermediate’, ‘Advanced’., based on the complexity of the content.
  • Click on ‘Private’ if you wish to make this content accessible only to your organization. (By default contents are private)

Step 4: Edit Content

Click on “Do you want to paste / edit HTML ?” option

Setting up redirection to your own awareness content


and paste below script with your own URL in the code editor

<head>
<script>
        function redirect() {
            window.location.href = "Your URL";
        }
        window.onload = redirect;
</script>
</head>
<body>
</body>

Step 5: Save Your Content

Click on save button to save your content.
Now while launching a campaign, select this content and you will be redirected to your own custom awareness content

Updated on July 4, 2024

Was this helpful ?

  • Happy
  • Normal
  • Sad
Viewing and Managing Contents
Table of Contents
  • Step 1: Navigate to content creation
  • Step 2: Enter Basic Information
  • Step 3: Configure Content Settings
  • Step 4: Edit Content
  • Step 5: Save Your Content
PhishGrid

167 Brittany Mnr Dr,
Amherst, USA 01002

  • [email protected]
  • +1 530-948-9667

Our Company

  • About Us
  • Press & News
  • Contact Us
  • About Us
  • Press & News
  • Contact Us

Platform

  • Phishing Simulation Platform
  • Phishing Simulation Service
  • Phishing Awareness Training
  • Attack Templates
  • Pricing
  • Phishing Simulation Platform
  • Phishing Simulation Service
  • Phishing Awareness Training
  • Attack Templates
  • Pricing

Resources

  • Blog
  • Infographics
  • Whitepapers
  • Blog
  • Infographics
  • Whitepapers

© 2023 Phishgrid. All Rights Reserved.

PhishGrid
  • Home
  • Platform
  • Service
  • Resources
  • Contact
  • Login
Signup for Free